Native eCommerce
Payment in Native Store
Payment in Native Store
 This content is only relevant for native store.
To determine which eCommerce solution you are on, see How do I know if I am using Native eCommerce or Third Party eCommerce?
The native store supports various payment gateways.
Online Payments
Your store can accept online payments from a variety of payment gateways.
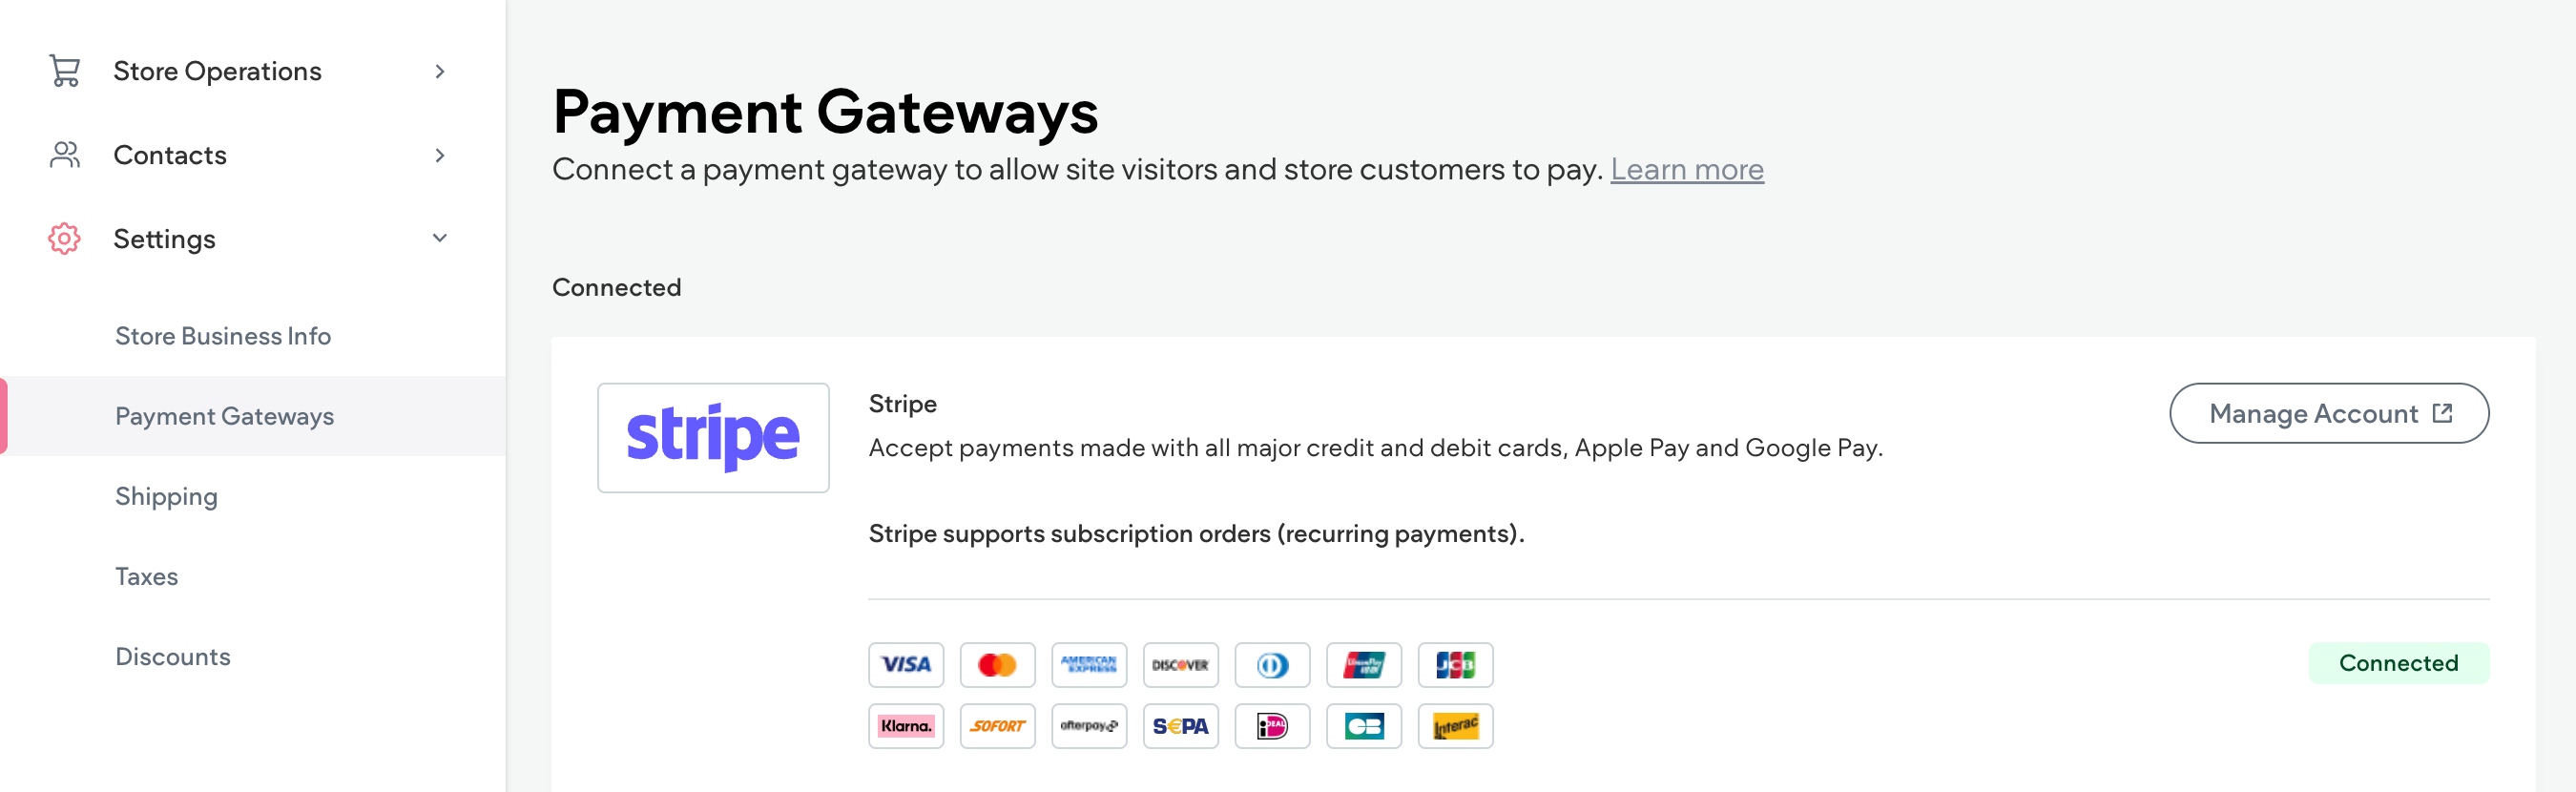
Stripe
Google Pay and Apple Pay wallets are not supported in Stripe if you also use automated taxes powered by Avalara or automated shipping with Easyship. This is due to a limitation in Apple pay where partial addresses are not accepted.
Note
Stripe enforces a minimum total charge, dependant on currency. If the checkout total is below the minimum total charge, the shopper will receive an error message and be unable to complete the transaction. This is important to note if you offer donations.
Connect Stripe
To connect Stripe:
-
In the side panel, click Store, then click Store Management.
-
Click Payments.
-
Click Connect Account next to Stripe.
-
Follow the on-screen prompts to log in and connect your Stripe Account.
Once your Stripe account has been successfully connected, a green connected badge displays on the Payment Gateways screen.
Add Payment Methods in Stripe
To add payment methods in Stripe, follow the Stripe payment method documentation. You must activate the payment method in Stripe under Website Payments Solutions for the payment method to display at checkout. Note that for certain payment methods, certain Stripe conditions need to be met for the payment method to work.
The following payment methods are supported in Stripe:
-
Klarna
-
Sofort
-
AfterPay (Afterpay cannot be used to pay for non-shippable items including digital products, services, or donations)
-
SEPA Direct Debit
-
iDeal
-
AliPay
-
Apple Pay
-
Google Pay
-
Cash App Pay
-
WeChat Pay
-
Link
-
Bancontact
-
EPS
-
Giropay
-
Affirm
-
Przelewy24
Note
-
If you are using Klarna or AfterPay, your Stripe merchant account must match both the customer's country and currency. For example, if the customer is in the United States, the merchant Stripe account must be set to United States and use the US dollar.
-
Some payment methods are only available in certain countries. If a payment method is not available, you need to add the country in the Store Business Information.
PayPal
PayPal is one of the most accepted payment methods worldwide, supporting online sellers from almost every country. With the PayPal integration, you can choose between the following options:
-
Express checkout. Shoppers are redirected to PayPal to log in to their account and then approve the payment. Once the payment is approved, the shopper is redirected to back to your store. Express checkout can be used with any other payment gateway.
-
PayPal Advanced Credit Card Payments + Express Checkout. This option allows your shoppers to choose between express checkout and advanced credit card payments. For advanced credit card payments, shoppers stay on your site during the checkout process and are not redirected to PayPal at any point. This allows you to customize the entire checkout experience. This method is currently available only in select countries, and for those with existing Business PayPal accounts.
Note
PayPal Express Checkout is compatible with all other payment gateways offered.
Connect PayPal
To connect Paypal:
-
In the side panel, click Store, then click Store Management.
-
Click Payments.
-
Click Connect Account next to the PayPal method you want to use.
-
Follow the on screen prompts to log in and connect your PayPal account.
Once your PayPal account has been successfully connected, a green connected badge displays on the Payment Gateways screen.
Note
PayPal does not display when your site is in preview mode. You must be on live mode to test it.
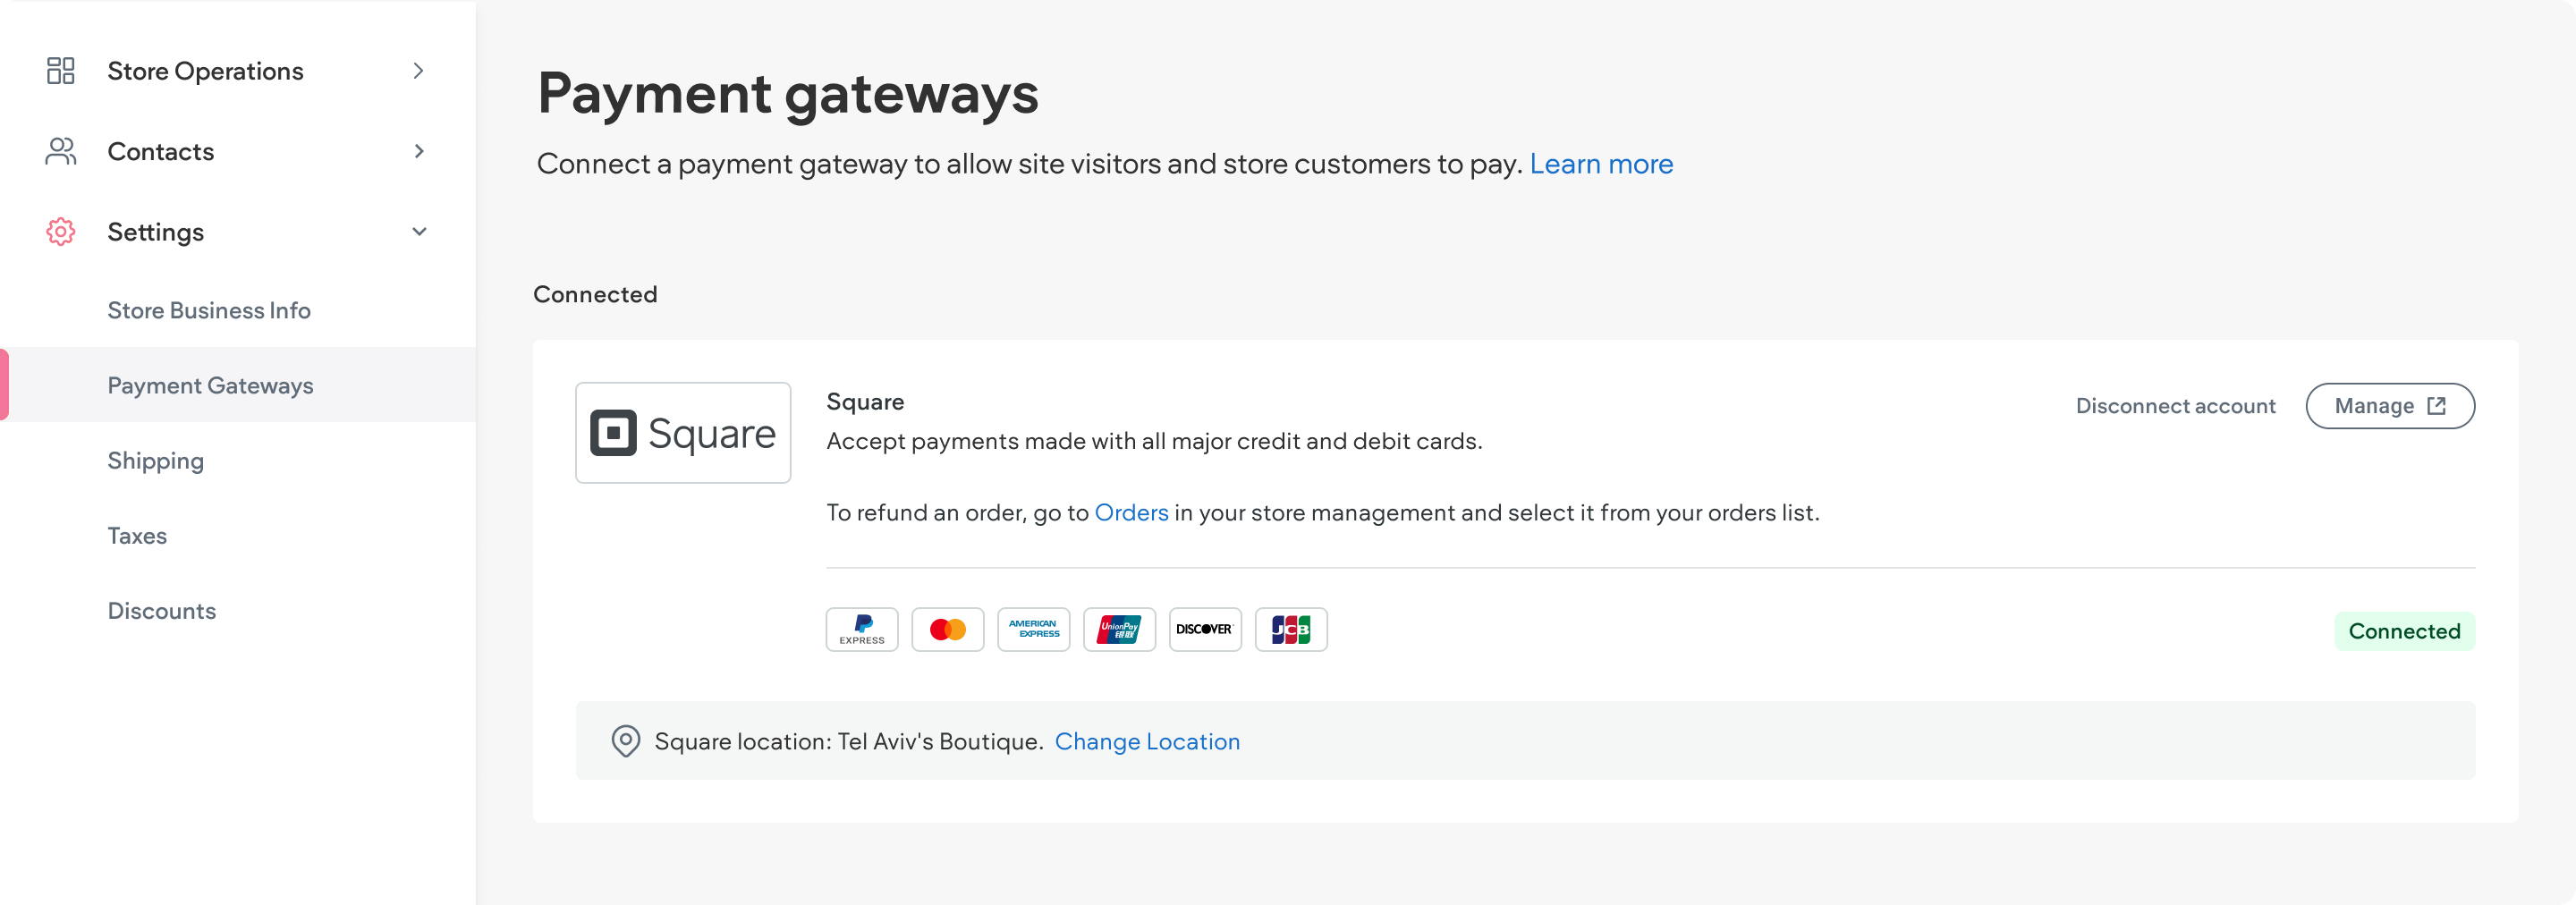
Square
This method is currently available only in select countries. For more information, see the Where Can I Accept Card Payments with Square section located on the International Availability page.
Note
Connecting Square will disconnect Stripe and any payment methods configured with Stripe.
Connect Square
To connect Square:
-
In the side panel, click Store, then click Store Management.
-
Click Payments.
-
Click Connect Account next to Square.
-
Follow the on screen prompts to log in and connect your Square account.
-
Once your Square account has been successfully connected, a green connected badge displays on the Payment Gateways screen.
-
(Optional) If you have multiple locations in Square and wish to select a different one, click Change, located in the Square location banner.
Native eCommerce does not charge any fees for using Square, however, Square does have transaction fees. For detailed information, see Square’s Fees and Accepted Cards.
Disconnect Square
To disconnect Square:
-
In the side panel, click Store, then click Store Management.
-
Click Payments.
-
Click Disconnect Account.
Authorize.net
Authorize.net is a payment gateway that enables store merchants to process Visa, Mastercard, Amex, and Discover credit cards.
It can be used in Native Store and for Bookings.
Note
Note that Apple Pay is currently not supported.
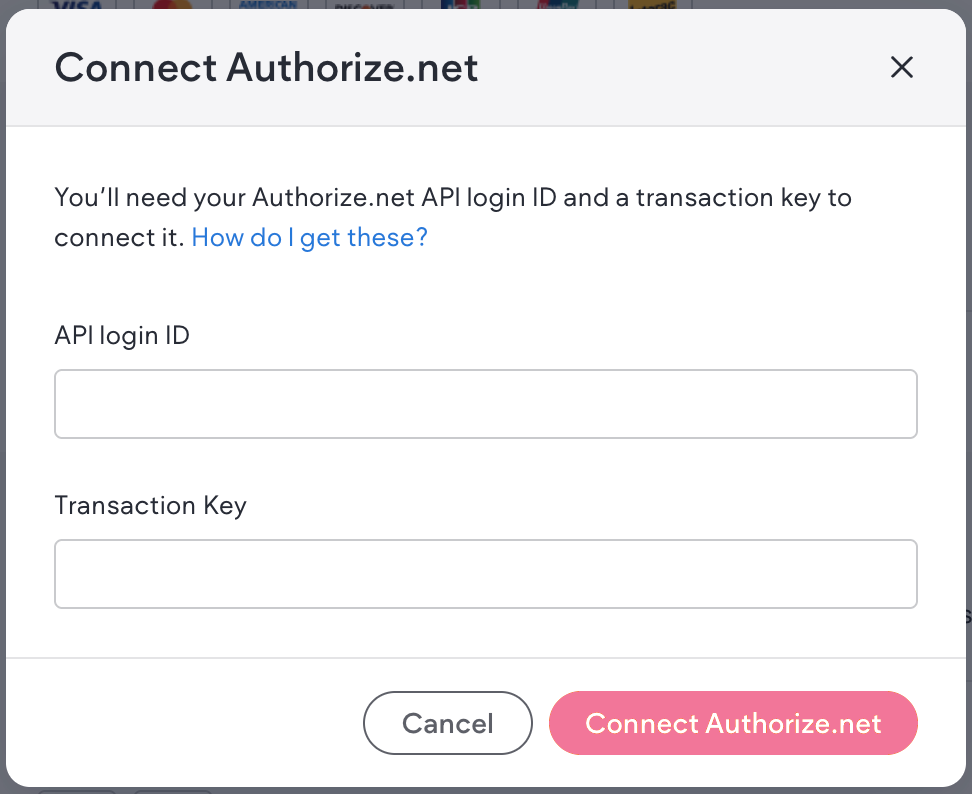
Connect Authorize.net
To connect Authorize.net:
-
In the side panel, click Store, then click Store Management.
-
Click Payment.
-
Click Connect next to Authorize.net.
-
Enter your API login ID and Transaction Key.
To locate your API login ID and transaction key from your Authorize.net dashboard, click the Account tab > select Account and API Settings > expand the API Credentials and Keys section > on this screen you can view your API login key and transaction key. For more detailed steps and information, see Authorize.net support article.
-
Click Connect Authorize.net.
After connecting Authorize.net, a green connected badge will display next to Authorize.net on the payment gateways page.
Disconnect Authorize.net
To disconnect Authorize.net:
-
In the side panel, click Store, then click Store Management.
-
Click Payment.
-
Next to Authorize.net, click the three dot icon and select Disconnect Authorize.net.
-
In the popup, click Disconnect Authorize.net to confirm.
A green banner will appear in the top right corner of your screen confirming that Authorize.net was disconnected.
Mollie
Mollie is a payment gateway that is popular in Europe. Merchants can process payments through Mollie and access a wide range of payment methods such as Apple Pay, iDEAL, Bancontact, Klarna, and more. Merchants can configure payment methods, issue refunds, and manage transactions seamlessly within the Editor.
Note
-
Currently, Mollie is only supported for online payments. Recurring payments and PoS are not supported.
Connect Mollie
To connect Mollie:
-
In the side panel, click Store, then click Store Management.
-
Click Payments.
-
Click Connect next to Mollie. You will be redirected to Mollie’s login page.
-
If you have multiple Mollie profiles, you will be prompted to select a profile. Click Confirm Profile Change.
Once your Mollie account has been successfully connected, you will be directed back to the editor and a green connected badge will display on the Payment Gateways screen.
Add Additional Payment Methods in Mollie
You can enable the following additional payment methods in Mollie:
-
Card payments (VISA, Mastercard, American Express, debit cards, etc)
-
Gift cards (Webshop Giftcard, Podium Cadeaukaart, VVV Cadeaukaart, YourGift, etc.)
-
Klarna
-
Meal vouchers, eco vouchers, and various other gift vouchers (Appetiz, Cadeau Pass, Chèque Déjeuner, Eco Pass, Edenred, Lunch Pass, Monizze, PassRestaurant, Swile, etc.)
To enable an additional payment method in Mollie:
-
In the side panel, click Store, then click Store Management.
-
Click Payments.
-
Under Mollie, click Offer customers more ways to pay through Mollie.
-
Next to the desired payment method, click Go to Mollie. You will be redirected to Mollie where you can enable the payment method. See Mollie’s documentation for help.
Once the payment method is connected, a green connected badge displays next to the payment method in the editor.
Disconnect Mollie
To disconnect Mollie:
-
In the side panel, click Store, then click Store Management.
-
Click Payments.
-
Click the three horizontal dots next to Mollie and select Disconnect Mollie. In the popup, click Disconnect Mollie to confirm you want to disconnect.
A confirmation message displays in the corner of the screen confirming that Mollie is disconnected.
Manual (Offline) Payments
Offline (or manual) payments allow merchants to accept payments outside of automated, online payment processing systems (like credit cards, PayPal, or other payment gateways) and instead pay in-store. In addition to driving traffic to your store, offline payments can benefit shoppers that want to avoid transaction fees associated with online payment gateways. Shoppers can also pay by check, by phone, or even cash on delivery.
Following are several types of manual payments:
-
Bank transfer
-
Pay in store
-
Cash on Delivery (COD): The customer pays the courier in cash when the product is delivered. The merchant confirms the payment after receiving it from the delivery service.
-
Checks: The customer sends a physical check, and the merchant processes the check before marking the order as paid.
-
Offline Credit Card Processing: The merchant takes the customer’s card details over the phone or through another method and manually processes the payment using an offline terminal.
-
Other Local Methods: This can include regional payment methods or in-person transactions that don’t involve online payment gateways.
Tip
It is helpful to pair a manual “Pay in Store” method with the Pickup in Store feature.
Add Manual Payment Methods
To add a manual payment method:
-
In the side panel, click Store, then click Store Management.
-
Click Payments.
-
Scroll down to the Accepting payments offline? section and click + Add Manual Payment.
-
In the popup, type a Payment method name and Payment instructions. Both these fields will be visible to customers.
-
Click Add Payment Method.
The new payment method and its instructions appear on the Payments screen. The payment method and instructions will appear for the shopper to select in the checkout process and in their order confirmation email.
Note
If the shopper is ordering a digital product, they will only receive an email with the download link for their product once the merchant marks the order as Paid or Fulfilled. For more information see, Manual Payment for Digital Products.
Edit or Delete Manual Payment Method
To edit or delete a manual payment method:
-
In the side panel, click Store, then click Store Management.
-
Click Payments.
-
Click the three horizontal dot icon next to the desired manual payment method.
-
Select Edit Manual Payment or Delete.
-
If you are editing, make the desired edits and click Edit Manual Payment.
-
If you are deleting, click Delete Payment Method in the popup.
Manual Payment for Digital Products
When a shopper selects a manual payment option for a digital product, their order confirmation email will not include a download link for their product. The merchant must either mark the order as paid or fulfilled.
To send the digital product download link:
-
In the side panel, click Store, then click Store Management.
-
Click Orders, then select the order from the list.
-
Do one of the following:
-
Click the Mark as Paid button, then click Mark as Paid in the popup. If you leave comments, they will be visible to only you and not the shopper.
-
Click the three horizontal dot icon and select Mark as Fulfilled, then click Mark as Fulfilled in the popup.
-
The shopper will instantly be sent an email containing their download link.
Discounts (Coupons)
Discounts are a great way to encourage shoppers to spend money at your store. Discounts can be either a set amount off the total price, such as $10 off, or a percentage off the total price, such as 10% off.
Create Discount
To create discounts:
-
In the side panel, click Store, then click Store Management.
-
Click Payments.
-
Click to expand the Sales tab, then select Coupon Codes.
-
Click + Create Coupon Code.
-
Complete the fields in the General settings section.
-
Name. Internal name for the discount. It is only visible to you and will not be seen by shoppers.
-
Effective date. The date the discount becomes available for use. Note this field uses the UTC/GMT timezone.
-
Expiration date. When the discount expires.
-
Usage limit per customer. How many times the same customer can use the discount code.
-
Total usage limit. How many times the discount code can be used in total by all customers.
-
Combine with other discounts. Whether or not this discount code can be used at the same time as other discount codes when checking out.
-
-
Complete the fields in the Promotion section.
-
Select your discount type. How the discount is calculated, whether it is a set amount or percentage of the purchase price.
-
Amount off. Amount of money the discount takes off the price.
-
-
Complete the fields in the Code & application section.
-
How will the customer apply this?. How the shopper will apply the discount, for example if the shopper enters the code in a box during checkout.
Note
Currently, only promo codes are supported.
-
Code. The discount code shoppers use at checkout. The code can contain letters, numbers, spaces, and special characters with no limit on length.
-
-
Click Create.