Website Builder
Set Up Bookings
Set Up Bookings
Note
To learn more about the Bookings feature and use cases, see the Bookings Overview article.
Bookings can be set up in four easy steps by an agency or a business owner. This article walks you through each step to start accepting bookings on your site.
To set up Bookings you need to complete the following:
-
Install Bookings and add the Bookings widget to your site.
-
Add the staff member(s) who provide the appointments and set their availability. You can do this by adding the staff member(s) yourself, or adding the staff member as a client in the Website Builder platform and inviting them to complete their own profile.
-
Create the various appointments the business offers. Add staff members to the appointment type and configure settings such as the appointment duration, location, cost of the appointment (if applicable), and more.
-
Configure and design the Bookings widget to match your site style.
Continue to the following sections to learn how to complete each step.
Watch the video below for a quick overview of the Bookings installation and setup process.
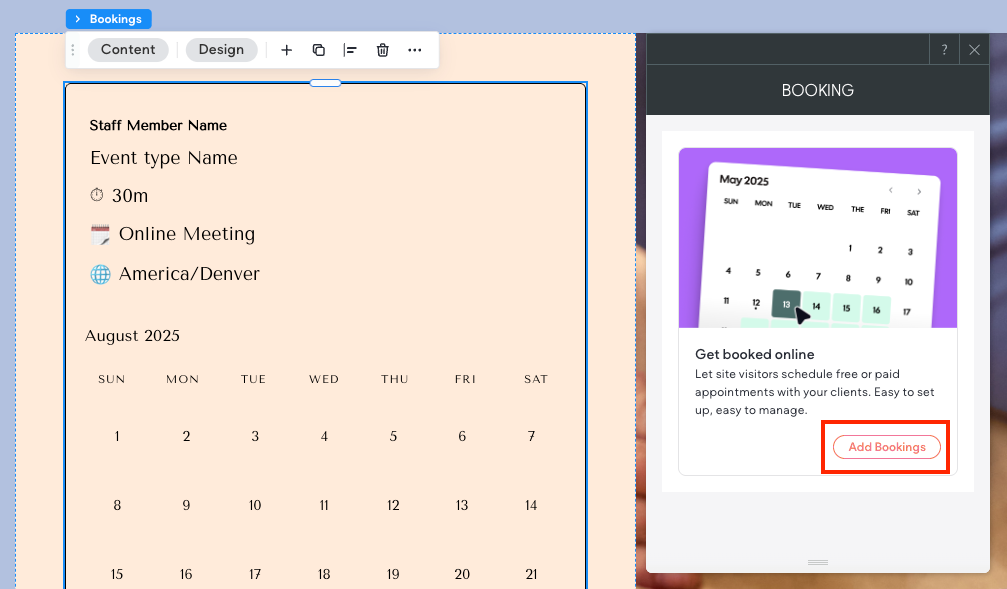
<!-- iframe instead of embed for d:videodata -->1. Install Bookings and add Widget
You, or a client user in the platform with the Bookings admin permission, can install Bookings from the Bookings item in the side panel or from the Bookings widget. If you choose to install Bookings from the side panel, you can add the widget in a later step. Note that some templates already have the Bookings widget added with Bookings installed.
To install Bookings from the Bookings widget:
-
In the side panel, click Add, then click Widgets.
-
Search for Bookings. Drag and drop it to the desired location on the canvas.
-
Click the Bookings widget to open the floating menu. Click Content to open the widget’s content menu.
-
Click Add Bookings.
2. Set Up and Connect Staff Members
Staff members are the professionals that provide the appointments, such as the beautician who offers a spa treatment, a lawyer who offers virtual consultations, or a plumber who offers repair appointments. In this step, you will add staff members as client users in the Website Builder platform and if applicable, configure their schedules. By default, one staff member is created for you but is not connected to a client user.
You can either set up the staff member yourself, or invite the staff member to complete their own profile. If you want the staff member to complete their own profile, you need to add them as a client user to your account and site with the Bookings admin permission.
To add a staff member and set their availability:
-
In the side panel, click Bookings.
-
In the Bookings section, click the Staff Members section.
-
Click + Add Staff Member.
-
(Optional) If you want the staff member top set their own availability and details, you need to add them to the Website Builder platform as a client user with Bookings admin permission, then connect them to the staff member profile in Bookings.
To connect a client user to a staff member:
-
Expand the Choose a client dropdown menu and click + Add new client.
-
Enter the staff member’s name and email, then click Add Staff Member. It is important to note that users who are already in the Website Builder platform as Team members cannot be added as Client users with the same email address.
-
The new staff member will receive an email with a link to confirm and set up their profile.
-
-
In the Availability section, set the staff member’s default availability. Following are the availability options:
-
Set a default schedule. Toggle on and off the days the staff member is available. For the days they are available, enter the times they are available. Click the Plus icon to add another time slot to a day. Use the Copy icon to copy the availability to other days.
-
Date overrides. (Optional) Set a schedule override for occasions where your staff member’s availability differs from their default schedule. For example, if your staff member has a one-time scheduling conflict, like a wedding or vacation, enter it here. This allows you to accommodate for the change in schedule without needing to change their regular availability. Note that date overrides are archived after the date has passed.
-
Timezone. Use the dropdown menu to select the timezone the staff member works in.
-
-
(Optional) In the Connect Calendars section, staff members added to the Website Builder platform as client users with Bookings admin permission can connect to their external calendar (Google, Outlook, or Apple) to add calendar invites, help check for conflicts, and prevent double bookings. Click + Add, then follow the instructions to connect your preferred calendar. Note that this can only be completed by the staff member since it requires connecting to their personal calendar.
-
(Optional) In the Conferencing Apps section, you can add Google Meet, Zoom, or MST Teams video as the default video conferencing app for virtual appointments. By default, Cal Video is used, but can be removed by clicking the three horizontal dot icon and selecting Remove App.
- Note that if any of the Appointment Types use Google Meet, the staff member providing the appointment must first connect their own Google calendar.
-
If you are completing the Staff Member details on behalf of the staff member, enter their name and email in the Staff member details section.
-
Click Save.
Note that as soon as the Staff member is saved, their availability displays in the Bookings widget without needing to republish the site.
3. Set Up Appointment Types
Appointment types are the various appointments you offer. In this step, you will create the appointment(s) set their duration, location, and configure any advanced settings that are applicable to your business.
To create a new appointment:
-
In the side panel, click Bookings.
-
In the Bookings side menu, select Appointment Types.
-
Click + New Appointment. Complete the following fields:
-
Title. This is displayed to bookers in the Bookings widget.
-
Duration. Set duration in minutes.
-
Assign this to all current and new staff members. By default, this toggle is enabled. If you need to assign specific staff members to the appointment type, disable the toggle and select the desired staff members from the dropdown menu.
-
-
Click Create.
-
Configure the following options in the Appointment type settings section:
-
Description. This field is optional and is displayed to users when viewing your appointment type.
-
Duration. Optionally, enable the Allow booker to select duration toggle and use the Available durations dropdown menu to select which duration options users can select from. Then, use the Default duration dropdown menu to set the default selection.
-
Location. How and where the appointment takes place. Options include virtual, in-person, telephone, and custom options for meeting location.
If you select In Person (Organizer’s Address) or Organizer Phone Number, you need to enter the address/phone number and select whether or not the address or phone number is displayed on the booking page and visible to the user before they book their appointment.
If Google Meet is selected for virtual appointments, the staff member providing the appointment needs to first connect their Google calendar.
-
Automated reminders. Optionally, use the checkboxes to select when you want the booker to receive an email reminder of their upcoming appointment.
-
-
(Optional) If you need to set up additional configuration options, click Show advanced options. See the Advanced Settings section to learn how to set up several of the most popular advanced settings.
-
On the Limits tab you can set buffer time between appointments, minimum notice before booking an appointment, limit booking frequency and duration, and more.
-
On the Assignment tab you can set the scheduling type (round robin or collective) and how to distribute appointments across multiple staff members.
-
On the Advanced tab you can customize questions asked on the booking page, require confirmation before accepting appointments, and more.
-
-
(Optional) If you are charging for the appointment, enable the Charge for this appointment toggle and enter a price in the field. If you previously enabled native store, the store’s settings will be inherited by Bookings.
If you have not previously enabled native store, you need to complete the following:
-
Enable desired payment method. You can connect supported payment gateways to collect online payments or you can use manual payment to accept in-person payments at the time of the appointment. To learn more about configuring each option, see Payment in Native Store.
-
When enabling payment gateways, note that Stripe supports credit cards and wallets, and Mollie supports credit cards, Apple Pay, direct debit, giftcards, and Paypal.
-
Discounts cannot currently be specific to Bookings or products in native store. If you create a discount, shoppers can use the discount on both Bookings and products.
-
-
Set up and configure taxes. To learn more, see Taxes in Native Store.
-
Tax groups are only applicable to products sold in the store and not Bookings.
-
If you use automated taxes, you cannot add a tax code to the category of the service. Instead, the default tax rate is used.
-
-
(Optional) Customize the checkout flow. To learn more, see Checkout Page in Native Store.
-
-
Click Save.
Note that the event is displayed in the Bookings widget as soon as you click Save, without needing to republish the site. However, if you do not have the Bookings widget installed and connected, you will need to republish your site after adding and connecting the Bookings widget.
Note
If you have multiple appointment types that are similar, you can save time by duplicating the appointment type you just created. To duplicate, click the three dot icon and select Duplicate. This helps save time when you need to create several similar appointment types.
Advanced Appointment Settings
In the following sections, you will learn how to configure several advanced appointment settings:
Set Buffer Time Before and After Appointments
You can set buffer time before and or after appointments to allow the staff member time in-between their appointments.
To set buffer time:
-
In the side panel, click Bookings.
-
Expand the Bookings section of the Site Dashboard and select Appointment Types.
-
Click to open the desired appointment.
-
Click Show advanced options, then click the Limits tab.
-
Use the Before event and After event dropdown menus to set buffer time.
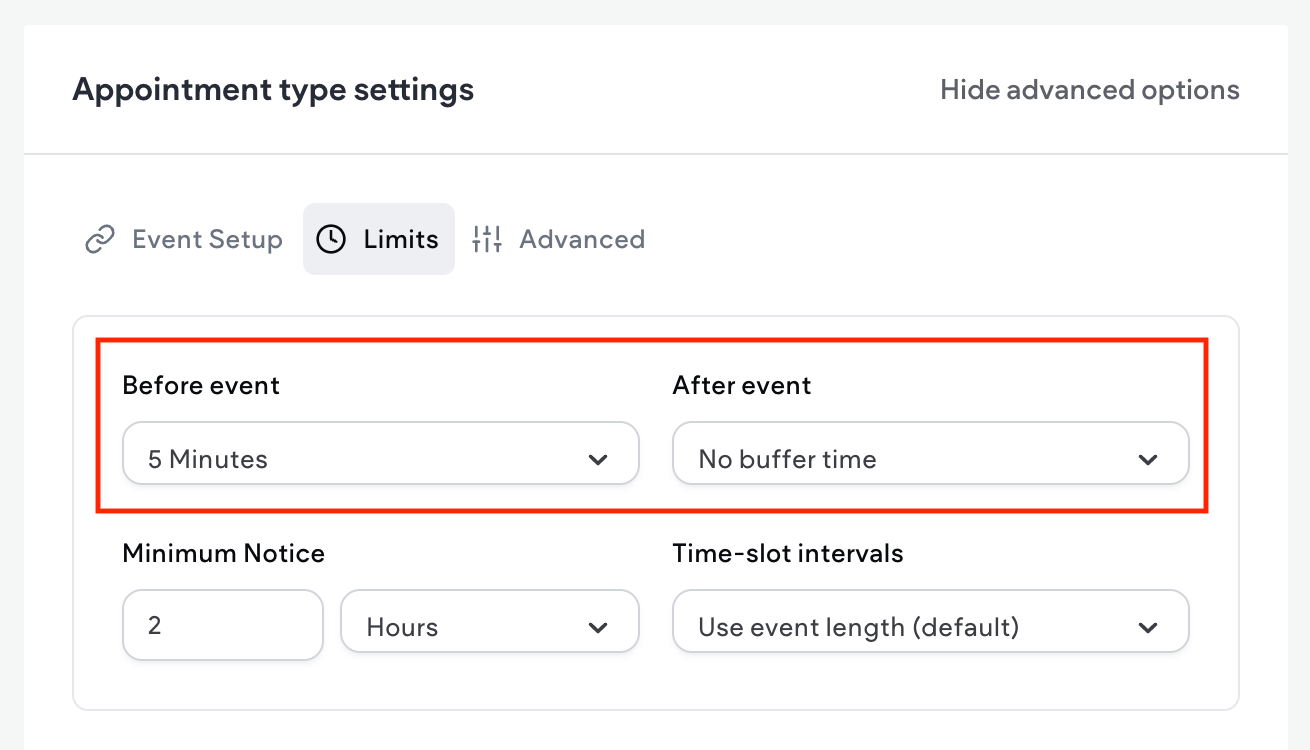
-
Click Save.
Require Bookings Confirmation
You can require that booking requests must be manually accepted by the staff member providing the appointment. You can require confirmation for every appointment, or you can set it so that appointments only require confirmation if they are booked less than a certain time in advance.
<!-- iframe instead of embed for d:videodata -->To require Bookings confirmation:
-
In the side panel, click Bookings.
-
Expand the Bookings section of the Site Dashboard and select Appointment Types.
-
Click to open the desired appointment.
-
Click Show advanced options, then click the Advanced tab.
-
Enable the toggle in the Requires confirmation section.
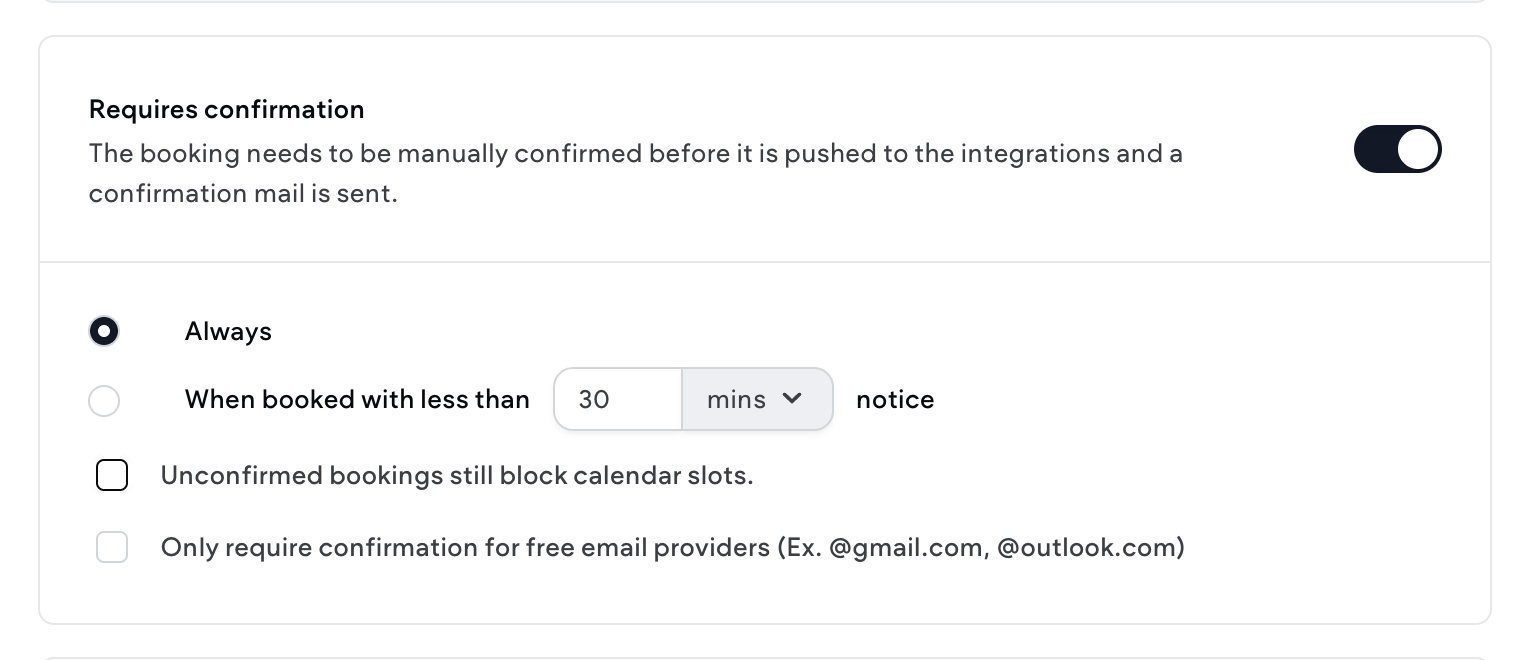
-
Select Always to always require confirmation before booking. Or if you only require confirmation when an appointment is booked last minute, select When booked with less than … and use the dropdown menu to set in minutes or hours how much minimum notice you need before required confirmation is enabled.
-
Use the checkboxes to select if unconfirmed Bookings block calendar slots or if you only want to require appointment confirmation for free email providers such as gmail or outlook.
-
Click Save.
Customize Questions for Attendees when Booking
When scheduling or requesting an appointment, attendees are prompted to answer several questions. Bookings offers default questions that can be enabled or disabled as needed. However, you may need to add custom questions to meet your business needs. For example, a spa needs to ask the attendee’s robe and slipper size so they can have the appropriate sizes ready.
<!-- iframe instead of embed for d:videodata -->To add a custom question:
-
In the side panel, click Bookings.
-
Expand the Bookings section of the Site Dashboard and select Appointment Types.
-
Click to open the desired appointment.
-
Click Show advanced options, then click the Advanced tab.
-
Scroll down to the Bookings questions section. You can enable, disable, or edit default questions as needed.
-
At the bottom of the question list, click Add a question.
-
Use the dropdown menu to select an Input type. Options include name, email, short text, long text, etc.
-
Enter an Identifier.
-
Enter a label for your question in the Label field. The label you enter is displayed in the Bookings widget and is visible to users. For example, a spa that needs your robe size might enter “What size robe?” as the label.
-
Depending on the Input type you selected in step 7, there are various fields to complete.
-
In the Required section, select either Yes or No.
-
Click Add, then click Save.
Set Minimum Time Before Bookings
To prevent last minute bookings that your staff member is not prepared for, you can set a minimum time before booking. For example, if you set the minimum time before bookings to 2 hours, an attendee cannot book a 3:00 PM massage later than 12:59 PM the same day.
To set a minimum time before bookings:
-
In the side panel, click Bookings.
-
Expand the Bookings section of the Site Dashboard and select Appointment Types.
-
Click to open the desired appointment.
-
Click Show advanced options, then click the Limits tab.
-
In the Minimum Notice field, enter a number. Then use the dropdown menu to select Minutes, Hours, or Days.
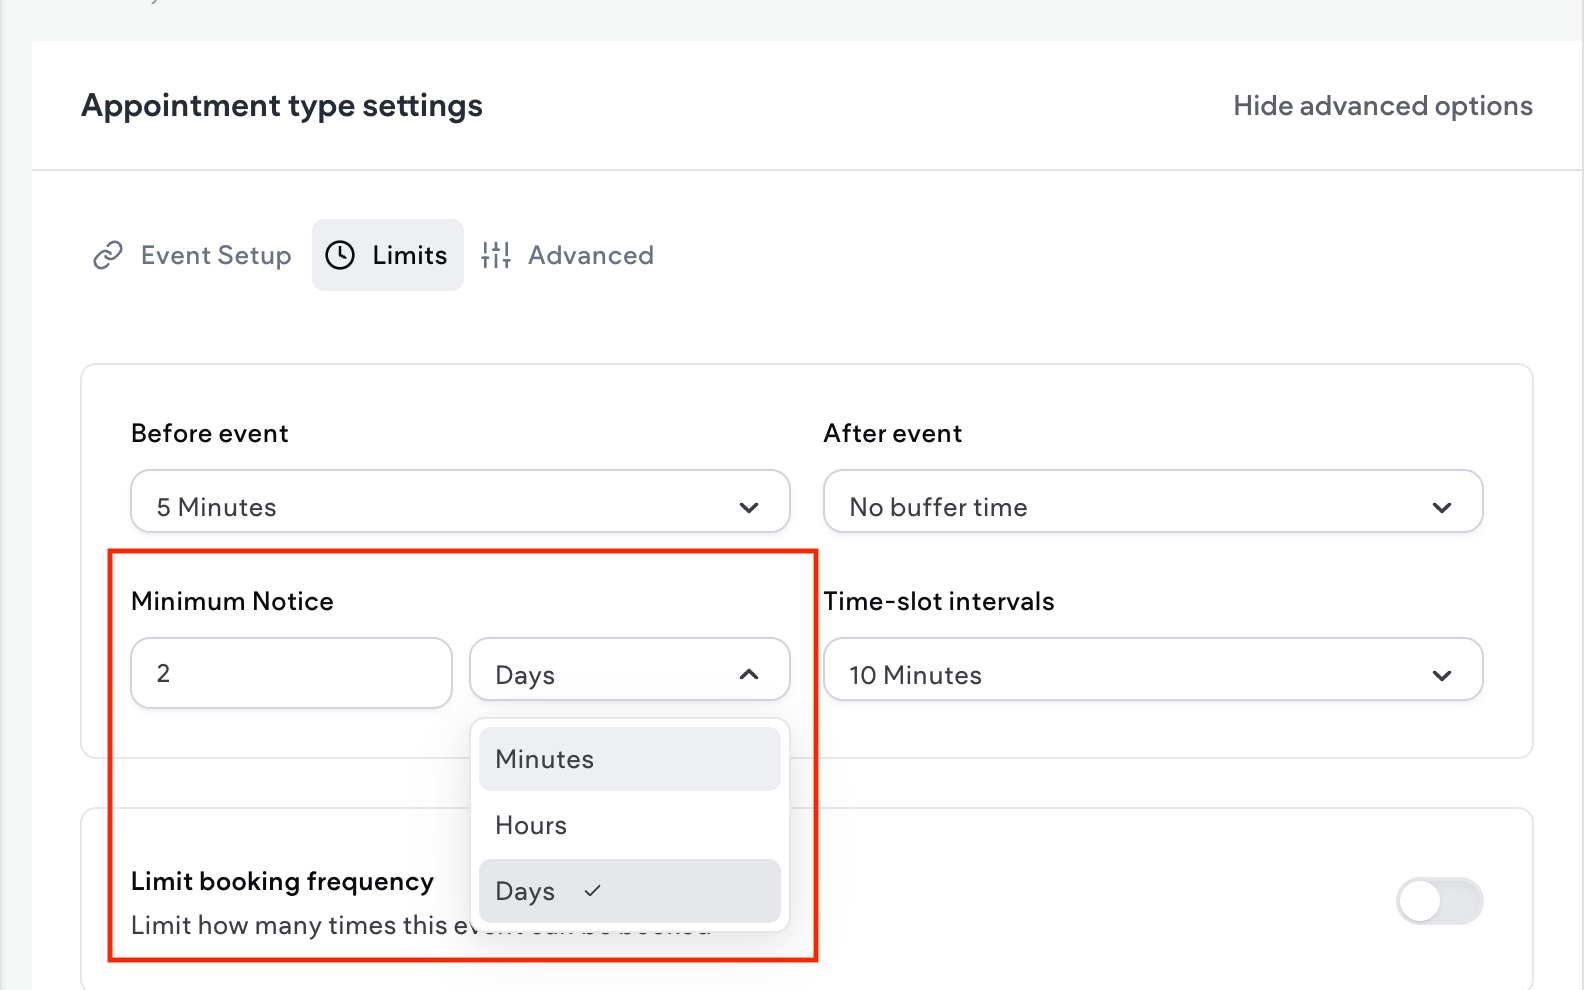
-
Click Save.
Set Scheduling Type to Round Robin or Collective
If you have multiple staff members, you can set the appointment scheduling type to Round Robin or Collective.
-
Round Robin allows appointments to be distributed across team members, depending on staff member availability.
-
Collective allows multiple staff members (service providers) to share one booking slot. This is helpful for meetings or sessions that require several team members. For example, a sales demo where both the account executive and technical specialist attend together. It is important to note that the appointment slot will only display as available when all the staff members (service providers) are available.
To set the appointment scheduling type:
-
In the side panel, click Bookings.
-
Expand the Bookings section of the Site Dashboard and select Appointment Types.
-
Click to open the desired appointment.
-
Click Show advanced options, then click the Assignment tab.
-
In the Scheduling Type dropdown menu, select either Round Robin or Collective.
-
If you selected Round Robin, configure the following:
-
In the Distribution section, use the radio buttons to select either Maximize availability or Load balancing.
-
(Optional) Enable the Include no show bookings in round robin calculations toggle.
-
(Optional) In the Round-Robin Hosts section, enable the toggle for either Enable Weights or Add all team members, including future members. Or, you can add the host using the Add a member drop down menu.
-
-
Click Save.
Set a Fixed Host for an Appointment Type
You can set a fixed host who always attends a certain appointment type. For example, the owner of an HVAC company might want their lead repair specialist to always attend repair consultation appointments.
To set a fixed host:
-
In the side panel, click Bookings.
-
Expand the Bookings section of the Site Dashboard and select Appointment Types.
-
Click to open the desired appointment.
-
Click Show advanced options, then click the Assignment tab.
-
In the Fixed Hosts section, enable the Add all team members, including future members toggle. Or, select the host from the dropdown menu.
-
Click Save.
4. Bookings Widget Design and Configuration
The Bookings widget is where the attendee will book their appointment. In terms of design, the Bookings widget inherits theme styles by default. However, you can switch to a basic black and white theme.
<!-- iframe instead of embed for d:videodata -->To configure the Bookings widget:
-
Click the Bookings widget to open the context menu.
-
On the Content tab, configure the following:
-
In the Appointment Types section, use the checkboxes to select which appointment types to display in the widget. If you are offering multiple appointment types, drag and drop them into the order you want them displayed in the widget.
If desired, enable the Appointment selection title toggle and enter text in the field.
-
In the Staff Members section, enable the Let customers choose staff member toggle if you want site visitors to be able to choose their desired staff member before booking their appointment. Note that site visitors are not required to select a staff member and can instead select to view all available appointments with all staff members for that appointment type.
If desired, enable the Staff member selection title and enter text in the field.
-
-
Click the Design tab and expand the Style section of the design panel.
-
Select either Site Theme or Basic.
-
(Optional) Configure animation and spacing for the widget.